Tuesday, April 28, 2009

Mother's Day Photo Gift Project Ideas

Yes, Mother’s Day is right around the corner, so it’s time to decide what project or craft idea your students will create this year to commemorate this annual event.  First, let’s think of the criteria.  It should be cute, sentimental, and perhaps even a little touching.  In any case, it should include student writing and creativity.  Actually, my favorite gifts are those that bring just a sweet tear to a Mommy’s eye when she opens it.  Can you tell I’m a mommy, too?

Today’s post will feature some technology infused Mother’s Day projects and links to help you come up with the best gift idea possible.  Most of these can be done in Photo Shop if you are familiar with the program, but I’m sharing how to many of these with Picasa, Picnik, and Microsoft Office.

Student Created Quilt Square

This can be as easy or as complicated as you want, depending on the amount of money you wish to invest.  Using PowerPoint, students create nine slides with each slide becoming one part of a 9 block quilt square.  I recommend the center square to have a digital photo of the student.  Just remember to take this photo in landscape so it can fill the entire slide.  The remaining slides you can fill with images of textiles (Insert – Clipart – search for “material”), WordArt, student photos, etc.  I would recommend choosing images that compliment in color. 

Cheapest Option 1 (Free) - Print the slides in house, choosing to print two slides per page on cardstock.  Cut out the slides and assemble to make the square. 

Cheapest Option 2 (Free)First convert the PowerPoint slides to JPEG images (File – Save As – Locate “Save as type” – click the drop down and choose JPEG).  Using Picasa 3, create a photo collage out of the slides.  The trouble with this one is you have no control over where pictures are placed.  You’ll need to continually press “Shuffle Pictures” until you find the layout you wish to use and print.  It’s a little tedious, but hey, it’s easy and free! 

Moderate Option ($24.95 flat fee)Using www.picnik.com register to join the premium status.  They have a collage feature that is a 9 square grid.  Simply upload the photos and drop them into the appropriate squares and print.  It does basically the same thing as Picasa, but having some control over the picture layout does free up some time for you.

Amazing Yet Costly Option (around $3-$5 per student) - Another option is to create your quilt square as listed above, but have the grid printed onto muslin.  I usually stop at the cloth store and pick up scrap material in the $1 bin and take that to a local printing house with all the student image grids saved on a jump drive.  The printing house will transfer the images onto the muslin for a reasonable fee.  Then I enlist someone who is a better seamstress than I to sew a backing on the grid.  You can opt to attach a dowel rod and string to make the quilt square ready to hang.  You can also purchase Inkjet Transfer Paper, but I think you’ll probably spend more time, money, and frustration doing this.

Presentation1

Wordle Reflections

Free Option - Wordles are so easy to create and do offer a way for students to capture how they would describe their moms.  Have the students generate a list of ten to fifteen adjectives that describe mom.  Is she funny? Witty? Smart?  What color reminds you of her?  How would you describe her laugh?  Depending on the age of the students, they can either dictate the list to you or type in the Wordle workspace.  Simply generate, customize if you wish, and print.  Team this with a nice digital photo and you have a wonderful gift.

Wordle: Untitled  

Pop Art Poetry

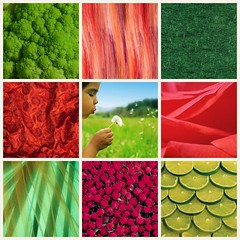
Free Option -We all remember Andy Warhol’s Soup Cans, but now you can create pop art easily with many of the photo tools online or with Picasa.  Take one or four digital images of each student.  I like to capture different facial expressions such as silly faces, laughing, etc.  Open up the images in Picasa and use the “Effects” tab to find “Tint”.  Here you can choose any color under the rainbow to tint the image.  Once you find a color, click “Apply” and then click “File” – “Save a Copy”.  This will automatically generate a new image on your computer.  Repeat the process until you have four different colored images.  Go back to the Library.  Select all four images and choose “Collage”.  Picasa will create the four image grid and save the collage as a new solid image.

The second part of the project is having the students write poems about their mothers.  I like to use the Instant Poetry Forms website as these are so easy to use.  Students simply fill in the blank, press create, and the poem is ready to copy and paste onto any document.  There are many forms to choose, but I recommend the Bio-Poem, Holiday Poem, or the Yes, But Poem for this project.

The last step is to assemble these two items together.  I use Publisher to insert the image at the top and then paste the poem below, but any word processing software would work.

Pictures1

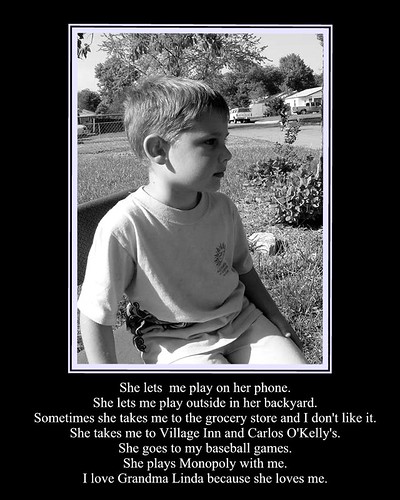
What I Love About My Mom Photo Project

This activity really pulls at the heart strings and creates a wonderful treasure.  Take a profile image of the each student.  I usually line up the entire class, walk them outside, set a chair under a tree, and take individual photos of them looking to the left.  The whole process takes about four minutes. 

Once inside, import the images into Picasa and turn each one black and white and save.  Switch to PowerPoint, turn the slide orientation to Portrait and format the Slide Design to all black.  Insert Photo Album putting one image on each slide.  Now invite the students to individually come and dictate and finish the following sentences at the computer recording their answers directly on the slide below their image.

“I love my mom because…”
“I love it when she…”
“She gives me…”
“She is the best mom because…”

Free Option - You can print the document on card stock or Moderate Option save the PowerPoint as JPEG images and have 8x10 images printed at Sam’s or Wal-Mart for just a couple of dollars per student.  They are beautiful when completed.

Paul grandma Linda by you.

Update - Another wonderful idea comes from another great Kansas teacher, Kristi Bruce. 

"Something quick and easy for 1st grade. . . . They have 40 minutes in the computer lab, so I had a Word template with the poem already typed (we read it as a class).  They added the Love, and their name, then inserted the picture they had saved from BeFunky  (thanks Jill Beam for sharing the site) and chose a frame (Word 2007).  After they printed, they went in and experimented with the other options in BeFunky.  The poem came from http://poemsforfree.com/mothersdaypoems.html."

This is the result.

Other Mother’s Day Photo Project Idea Links

Kitchen Photo Recipe Cards – these would be cute for primary students to write their own recipe on “How to Make a Great Mommy”.  Be sure to print on cardstock or you could use the Avery Inkjet Magnet Sheets and create a fun refrigerator magnet.

Mamarama Photo Card and Bookmark

Mother’s Day Photo Frame

Mother’s Day Photo Gift Bags

Mother’s Day Photo Mattes

Sunday, April 26, 2009

Best Embeds for Educational Wikis and Blogs

Now that you and/or your students are using wikis and blogs, are you curious what could be added to them?  From animated slideshows to collaborative documents to interactive review games, many great (and free) tools are available.  As a follow up to my previous post “What Teachers Should and Should Not Be Posting on their Classroom Webpages”, I’ve pulled a master list of embedding options that will hopefully spark your imagination. 

As you browse the list consider how you will use these embeds.  While some of these work perfectly for classroom blog posts, others tend to be more effective wiki tools.  Do you want students to view a video clip and then leave comments below?  That’s a perfect blog scenario.  Or do you want students to collect data in a form?  Yep, that’s a wiki tool.  I know your wheels will be turning to come up with great new ways to use the tools. 

One note of warning, however.  If any of these sites are blocked at your school, the embeds will also be blocked.

Good luck and again if you have any other suggestions please post them in the comments section.  The more tools available, the nerdier we all can be.

Collaborative Project Tools

  • aMap is an excellent tool for social studies projects.  This tool provides a visual tool over debatable issues.  When it is embedded on your site, students can take positions and fill out the map online. The embed code is located under share your aMap.
  • Glogster is quickly becoming one of my favorite Web 2.0 tools, and now that there is an educational side, I’m really excited.  With Glogster teachers or students can create interactive posters or digital scrapbook pages that provide links out to other sites.  It’s a great visual to kick off a unit or wiki.  For an example, check out Civil War Sallie, which is an awesome Travel Buddy wiki created by a 6th grade student or Lit Circles, a site I created with links to support several novels.  The embed code is provided when you save the glogster.
  • Google Forms – You will need to have a Google Account to use these as the forms are part of the Google Docs area.  What I really like about the use of Google Forms for projects is they can be used for many purposes.  Gather data from project partners, create a parent survey, assess your students’ prior knowledge on a topic, or even design a test.  The forms are easy to create and easy to embed.  Start with one of the Google Form Templates or generate your own from scratch.  To find the embed code click More ActionsEmbed.
  • VoiceThread – This is a wonderful tool that simply takes student collaboration to the next level.  Here students can share in discussions over images or video in an amazing way.  If a person is already logged into Voicethread website, he can comment on a voicethread directly from your class website.  The embed code is found under embed.

Communication Tools to Parents and Students

  • Google Calendar – I’ve become a big fan of Google calendar this spring.  The best part of this is parents can either view the calendar on your page or they can subscribe to it if it’s public.  It’s an excellent tool to mark class events, field trips, major deadlines, etc.  To find the embed code follow these directions.
  • Google Maps – Do parents need directions to a field trip destination or to a track meet?  Go into Google maps and look up the destination’s address.  Once the map is generated, click Link to this page, copy the web address from the Paste HTML to embed in website field in your browser and paste it into the HTML code of your wiki.
  • Interactive Graphic Organizers – ClassTools is truly a gem for any teacher whether you embed or not, but since you can, I highly recommend checking out this site.  You can create venn diagrams, timelines, and more to be embedded on your site.  Click on the gear icon to get the embed code.
  • Mixbook  - It allows you to create online digital scrapbooks to share with parents.  This can be used for digital storytelling projects, as well, but students will need a login verified by an email.  The embed code is found under share.
  • Polls – Interested in polling students as a discussion starter?  Poll Vault is an easy tool to use.  Simply create a poll and click share to find the embed code.  Poll Everywhere is another tool where students can either vote online or SMS text their responses in.  The embed code is on the right under Publish.
  • PowerPoints – There are several tools that will allow you to convert your PowerPoints into the embeddable slideshows.  Google Docs, Slideshare, MyPlick, and Slideshow will allow you to upload your PowerPoint and provide you an embed code to put on your website.
  • Review Game – MyStudiyo allows you to create review quizzes and embed them on your site.  The code is found when you click spread the word.
  • Screenshots with comments – Skitch is an easy tool that allows you to screen capture, make annotations, and embed them on your blog.  To find the embed code click webpost.
  • Visitor Map – Curious to know who is visiting your class blog?  Consider using Whos.Amung.Us.  You would need to add this as a widget on a blog or simply add to the HTML of a wiki.
  • Webpage Links – Wallwisher is a virtual bulletin board to cover with virtual post-its, but I really like to use this as a way to share websites with students or parents.  It can also be used collaboratively so parents could leave encouraging notes to students.  The embed code is located under Do More.
  • Word Documents – Scribd, Issuu, Calemeo allow you to upload your Word (including 2007 documents) and PDF documents while providing you an embed code.  Now parents and students can view handouts and such without having to have Microsoft Office on their home computers, plus Calemeo will allow you will to create digital books.

Photos

  • Animoto –Animoto is a wonderful tool to make photo music videos that can be easily embedded on a wiki or blog.  Be sure to sign up for the “Educator” version to take advantage of all the features.  This is an example Animoto created by an Andover High School Social Studies teacher as an introduction to the 1950s. The embed code is found with the Thumbtack Icon.
  • BubbleShare – is another slideshow creator except this tool uses fun frames like television sets or a theater stage.  The embed code is listed above the slideshow.
  • Photopeach – This is a fun slideshow creator that comes with audio and the easy ability to add text over your images.  The embed code is found underneath the slideshow.
  • Picasa Web Album Slideshows – If you aren’t familiar with Picasa 3 from Google, you’re missing out.  This free tool not only is one of the easiest photo editors around, it allows you to save and share your photos on the web.  When you have an album created online, look for the Link Button on the right.  You’ll see an option for Embed a Slideshow. 
  • Slide.com – is a fun and creative slideshow tool that will allow you to put clipart and glitter around the images.  The embed code is underneath the slideshow.

Student Products

  • Bookr form PimPamPum – Pulls in photos from FlickR, but allows students to create digital books online.  It’s an easy and amazing digital storytelling tool.  To find the embed code click Blog This.
  • Bubbl.us – With this tool you can create a brainstorming mind map and embed it on your wiki.  To keep from having students needing accounts to login, this would be a perfect tool to have one teacher account and use the interactive white board to create as a whole class then embed on the class wiki.  The embed code is located under the Menu button in the bottom right corner.
  • Wordle – The use of Wordle has become very popular in the past year and with the ability to easily embed them, why not use them on your class webpage?  The embed code is found directly beneath the generated Wordle.

Videos

  • BBC Video News and CNN News – Running a current events class?  If so, you might be interested in embedding news videos on your site.  The embed code for BBC is found when you click “share” and CNN’s code is just below the video.
  • Live Video Feed from Your Classroom – Having a guest speaker or are students doing a reader’s theater performance?  Consider turning on a webcam and broadcast from your website.  Ustream allows you to set up your show and provides you with the embed code just below the video window.
  • SchoolTube – If you haven’t checked out SchoolTube, you are missing out.  Many of these student films are very good films.  You’ll find math tutorials, student performances, and more.  Simply check out the Video of the Day to see what’s been uploaded lately.  Also consider uploading your own class films here and embedding them on your website.  It’s a great way to archive class activities to share with parents.  The embed code on the right.
  • TeacherTube – TeacherTube is currently going through some big changes like allowing you to upload documents to share and creating a community piece.  The videos do have embed codes on the right.
  • YouTube – With the wealth of options at YouTube, you can usually find some great conversations starters for classroom discussions or tutorial videos on just about anything.  I definitely want to direct you to this blog post about embedding tricks for YouTube.  For example, you can embed just a portion of a YouTube clip or set it up to autoplay on your site.  The embed code on the right.  I recommend checking out YouTube Edu, as well.

Tuesday, April 21, 2009

Travel Buddy Projects Part II

Do you have students who take family vacations or have special opportunities to travel during the school year?  What sort of assignments do you require them to do while away?  Do they journal their adventures and gather brochures to report back to the class?  If so, you’ll be very interested to read how today’s guest writer, Mary Rizzo, a Technology Assistant and Webmaster at Parsley Elementary in Wilmington, North Carolina shares with you her travel buddy project ideas.  I was thrilled she contacted me and I hope you’re inspired about this twist to the travel buddy project.  Thanks Mary for sharing your story at Making Teachers Nerdy.  Hopefully, many schools will be inspired to duplicate the idea and start their own traveling mascot program.

Parsley Elementary (www.nhcs.net/parsley), a K-5 school in Wilmington, NC, is home to the Patriot Kids travel buddy mascots named Liberty, Justice, and Freedom.  These school mascots have been active members of the school family for 6 years and had some amazing adventures.  Among other 21st Century integration skills, the Patriot Kids have recently added blogging to their bag of tricks. 


For three years now, the Patriot Kids have joined Parsley students and staff when going on a family vacation or classroom field trip.  These characters have been printed on banner material allowing for ease of travel and durability.

When students want to book a vacation with one of the Patriot Kids, they download, complete and submit a vacation contract.  Upon receipt, the vacation is booked (dates are blocked on a calendar on the school website).  When the student returns to school he/she emails the school a trip story along with photos.  Until recently, the trip story was published on a webpage on the school website.  Beginning at the end of March, we began posting the stories on a blog:  http://parsleypatriotkids.blogspot.com/

Patriot Kids by you.


The original idea for this project was to integrate geography and writing with technology.  Each story is linked to a location on a map of the world, United States, or North Carolina.  Links to more information about the location are made available for the students to learn more about the area visited. 

Publishing the trip stories on a blog now allows visitors the opportunity to make comments or ask questions.  As this is a new venture for us, we have only just received our first comment.  If questions are received, they will be forwarded to the student to answer.

Another recent addition to our program is the creation of a business card for the students to take on the trip.  From personal experience, it is not uncommon for someone to come up to you while having your picture taken with one of the Patriot Kids and ask what you are doing.  The business cards will help the students introduce the program to inquisitive folks they encounter on their trip.

Sending the Patriot Kids with our students on an adventure has been very successful.  We encourage students to also consider taking one of the kids on a trip around our hometown, even for a trip to the dentist, the park, or a local museum.  The purpose of the program is for students to share their adventures with fellow Parsley Patriots and hopefully teach us something new about the world around us.

For more information about traveling with the Patriot Kids, visit  http://www.nhcs.net/parsley/PatriotKids/PatriotKidsVacations.htm

patriotkids1 by you.

Monday, April 13, 2009

10 Microsoft Word Tricks Every Teacher Should Know

We all know that Word does a whole heap for the business world, but there are some features that work great for educators.  Whether you are creating a test or worksheet, or helping your students format a formal paper, these tricks should make things easier.  Plus, I just love easy, don't you? 

Yes, there are more tricks up my nerdy little sleeve, but today I'm going to start with my top ten.  Master this list and your nerd points will increase enough to handle my future posts.  Good luck everyone.


Alphabetizing a List – When you create a bulleted or numbered list, Word can alphabetize them quickly. 
2003 and earlier click
Table – Sort – ascending
2007 click Home Tab – IconSort_16x16 by you. icon(Paragraph Dialogue Box) – ascending

Basic Shortcuts – Cut (Ctrl+X ) Copy (Ctrl+C) Paste (Ctrl-V) Undo (Ctrl+Z)

Create a customized bulleted list with happy faces or check marks as the bullet.  You will need to create a list first then do the following:
2003 Users click Format – Bullets and Numbering – Customize – A new window will pop up – Choose Character – Choose Wingdings or Symbols – Select a Character – OK - OK
2007 Users click Home Tab – Drop drown next to the bullet icon – Define new bullet –Symbol – Selected a Character – Ok – Ok.

Creating a Hyperlink – As an alternative to pasting an entire website address (URL) do the following.  Type the title of the website – highlight the title – Click Ctrl-K.

Determining Word Count – Microsoft Word will do a word count quickly for you and your students.
2003 Users - select the text you want to count - Tools – Word Count

2008 Users – select the text you want to count – look at the bottom right of your screen – word count is automatically calculated.

Dictionary/Thesaurus ShortcutHold the Alt key down and click on any word, the Reference Toolbar opens and gives the definition of the word as well as synonyms.

Double and Single Spacing Shortcuts – CTRL+2 turns on double spacing for the document where CTRL+1 reverts to single spacing

Hanging Paragraphs – A paper can be set up to automatically indent the first line of any paragraph. 
2003 and earlier click Format – Paragraph – Special – Hanging. 
2007 click Page Layout tab - Paragraph Dialog Box Launcher– Special – Hanging.

Highlighting the Easy WayDouble click on any word and it will highlight. Triple click will highlight an entire paragraph.  CTRL+A will highlight the entire paper.

Insert special characters such as the copyright symbol ©or the degrees ° symbol.  .
2003 click Insert – Symbol – a new window will pop up and double click any symbol.
2007 click Insert Tab – Symbol – select one of the suggested symbols or choose More Symbols.  Double click on any symbol.

Instant Auto Correct – If you find a word that is underlined in red, it’s misspelled.  Simply right click on the word and Microsoft Word will provide suggested spellings.

Tables are your friend.  No more will teachers create worksheets where they have to use the tab key multiple times.  Using tables will eliminate a lot of formatting hassles later on.  Table borders can be turned off so your worksheet looks balanced without seeing tables on the screen.  This is a great tutorial from Office 2003, but the basic concept is the same for 2007.  Watch the video below first, and then for 2007 users check out this link.


Thursday, April 9, 2009

12 Best Google Keywords for Finding Classroom Resources

Are you ever overwhelmed with searching for classroom resources?  Do you seem to suffer from brain fades as you stare in the Google search engine wondering where to begin?  No worries.  Today, I’m offering my personal keyword and key phrase arsenal to help you navigate Google in record time and still find the best resources for your students.

I would recommend printing off this list before you begin searching as a quick reference.  Goodness, even I have the list close to my computer as I get stumped on playing the Google word game from time to time. 

Good luck and may the keyword be with you.

  1. BiographyThis is a keyword for students and teachers alike.  Anytime you are discussing a historical or significant figure, using the keyword biography narrows down the search quickly.  Additionally, I would add site:edu or site:gov to give better results.
  2. Discussion questions – This key phrase is a must for language arts and social studies teachers if you are looking for questions you can either put on a test or use in classroom discussions.
  3. Practice ExercisesMath and grammar teachers need to grab a hold of this key phrase as you will quickly locate a wealth of premade resources for your students.  Some will be printable and others will be interactive.
  4. Interactive – using this keyword will help you find websites that work great with interactive whiteboards.  Generally these are sites that allow the user to manipulate the website content in some way.  It’s a guaranteed winner.
  5. Internet scavenger huntthis is a moderately successful key phrase that allows you to find premade student internet activities.  I would recommend checking all the links in a hunt, but generally you will find some real treasures out there.
  6. Lesson plansThis is also a solid key phrase that generally returns multiple results.  I often browse four or five on a topic to get my creative wheels spinning.  More often than not, I’ll take pieces from several sites to create my own lesson.
  7. QuizAh, yes, quizzes that are already made up.  You have to love that! 
  8. Readers theater or readers theatre –This works better for elementary searches over older grades, but every now and then you’ll find a true treasure.  Most readers theatre scripts on the web are three to five pages in length and offer multiple voices.
  9. Timeline – This is a definite keyword language arts and social studies teachers should use.  Any significant historical event will have multiple timelines on the web to share with students.
  10. VideoUsing this keyword will pull YouTube videos and others into your Google search results.  More often than not, I’m finding student made films for literature which make wonderful introductions to novels.
  11. Webquest  - over the past several years, webquests have been made for nearly every curriculum unit one could imagine. By using the keyword webquest, you might find half a dozen of premade activities for your classroom.  There is a caveat, however.  The websites used within the webquest may not be active, so you might have to provide additional resources for your students.
  12. Worksheet or handout – Another solid keyword that will help you find great premade activities or student handouts for your lessons.  Just print and go. 


Thursday, April 2, 2009

End of the Year Slideshows – Kick ‘em Up a Notch!

Ah, Spring.  Poetry writing, field trips, research papers, and all those great units we love to teach after the state assessments.  It’s definitely one of my favorite times of the year, yet I know how much we all cram into those last few weeks.  Even I have been guilty of playing beat the clock with content until Field Day rolls around. 

Today’s blog post will feature one of the most common spring teacher projects – the end of the year slideshow.  Yep, you’ve seen dozens over the past few years and even created one or two, but today I’ll discuss ways to improve, simplify and enhance them.  I mean, there has to be an easier and cooler way, yes?  You bet!

Simplify the Prep Work

Place all the images in one folder.

Number the images chronologically with 3 digits (e.g. 001, 002, 003, 004).  Trust me on this one.  Video programs always drop the images in alphabetically, so if you number them 1, 2, 3,…10, 11, 12, the computer actually reads those as 1, 10, 11,….2, 20, 21. 

Only feature the best images of the year.  I encourage teachers to pick the top 150 photos and call it good.  If slideshows are too long, they become tiresome for everyone.

Consider the music you will use.  Yes, the struggle here is one with copyright as we all know legally we cannot use copyrighted songs (even though most folks use them, anyway).  Even if you follow the 30 second rule for a song, that rule is only for classroom instruction and student projects, not slideshows given as end of the year gifts to students and parents.  What you really want is royalty free music.  Larry Ferlazzo has an amazing list recommended royalty free music sites I encourage you to investigate.

Make it Snazzy

Today teachers have a wealth of wonderful Web 2.0 tools today specifically designed for photo slideshows.  The best part –they are free! 

Animoto is by far the coolest slideshow tool around, and it’s free for teachers. Simply sign up for the educator version (which is $35 for everyone else) and you’re ready to play. The trick to Animoto, however, is knowing your slideshow will only equal the length of one song.  I learned this one the hard way.  I uploaded 127 images and only the first 20 showed up in the final product.  To get around this issue, you will need audio editing software such as Audacity for PC or Garage Band for Mac.  Merge multiple songs into one large audio track.  Most songs are around two or three minutes, so you will probably need four songs total.   Also with Animoto educator account, you can download the final video product and burn to DVD.  Voila!  You’re done in no time.

Picasa 3, a free PC/Mac photo editing tool from Google, also features a free slideshow creation tool.  Simply select the photos, click “Movie”, choose your audio track, and with a few simple clicks, the video is made.  It can be burned to a gift CD/DVD or uploaded to YouTube.


Photo Story 3 is a popular choice for many teachers, but it has one quirk.  If you wish to burn the slideshow onto a DVD, you will need to purchase the DVD plugin software from Sony.  We have tried to burn slideshows from Photo Story without the plugin, and the images are all pixilated.  It is worth the $20 to make this work effectively.

Make it Memorable

I’m no professional photographer, but I have discovered how some photos pull on the heartstrings or leave a smile on a face.  Here are some ideas that might get the creative juices flowing:

  • Take black and white photos of the students expressing emotions such as silly, exhausted, sad, confused, or pensive.

paul2  paul5

  • Take a series of photos featuring students’ hands or eyes.  The hands could be using math manipulatives, keyboarding, painting, pushing another student on a swing.  The eyes could be focusing on other students, gazing out the window, reading, or concentrating on a science experiment.
  • Grab your school mascot and take photos of favorite places around the school such as the cafeteria, playground equipment, a reading spot, or the gym.

img00026

  • Take photos from different perspectives. What is the view from the classroom door?  Standing in line during lunch? Loading a bus?

Make it Personal

Most end of the year slideshows are given as gifts to the students.  Why not leave a bit of yourself in it for them?  Using PowerPoint, you could write a letter to them on three or four slides.  Those slides can be saved as images and placed in the photo slideshow at the end.  Write about your favorite moments of the year.  Add funny student quotes.  Leave them with your hopes for them as they progress to the following grade.  You might be surprised how much they will treasure your thoughts.

I hope these tips and suggestions provide you with some ideas to improve your slideshow this year.  Even if you aren’t tech savvy, I encourage you to call on those who are.  All it takes is your ideas to make a great product, and you will leave your students a wonderful gift they will treasure.